Add PN532 NFC Tag Feature to ESP32
@ref: https://esphome.io/components/binary_sensor/pn532#component-hub
Hardware
- PN532
- ESP-WROOM-32
Getting Started
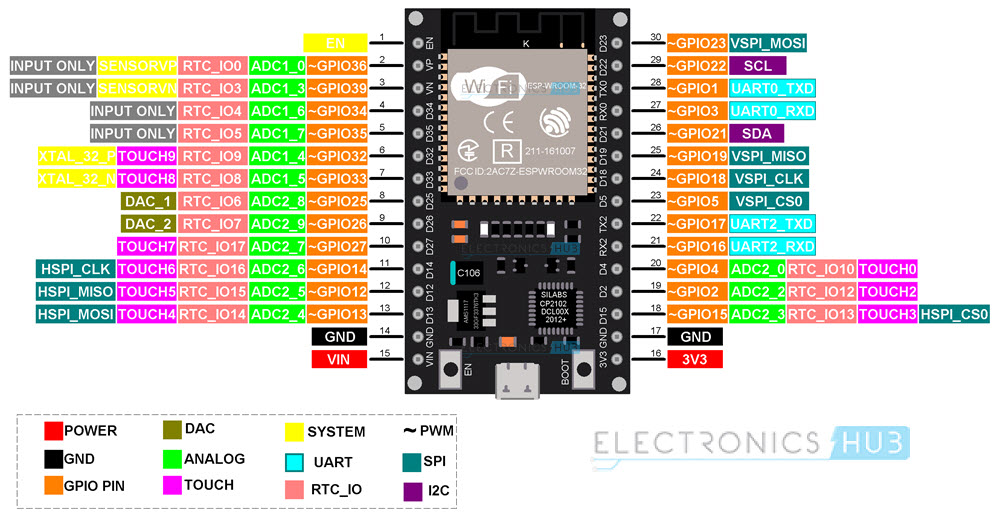
We will configure the PN532 board to use I2C instead of SPI since it only require 4 pins.
@ref: https://www.electronicshub.org/esp32-pinout/
Initialize ESP32
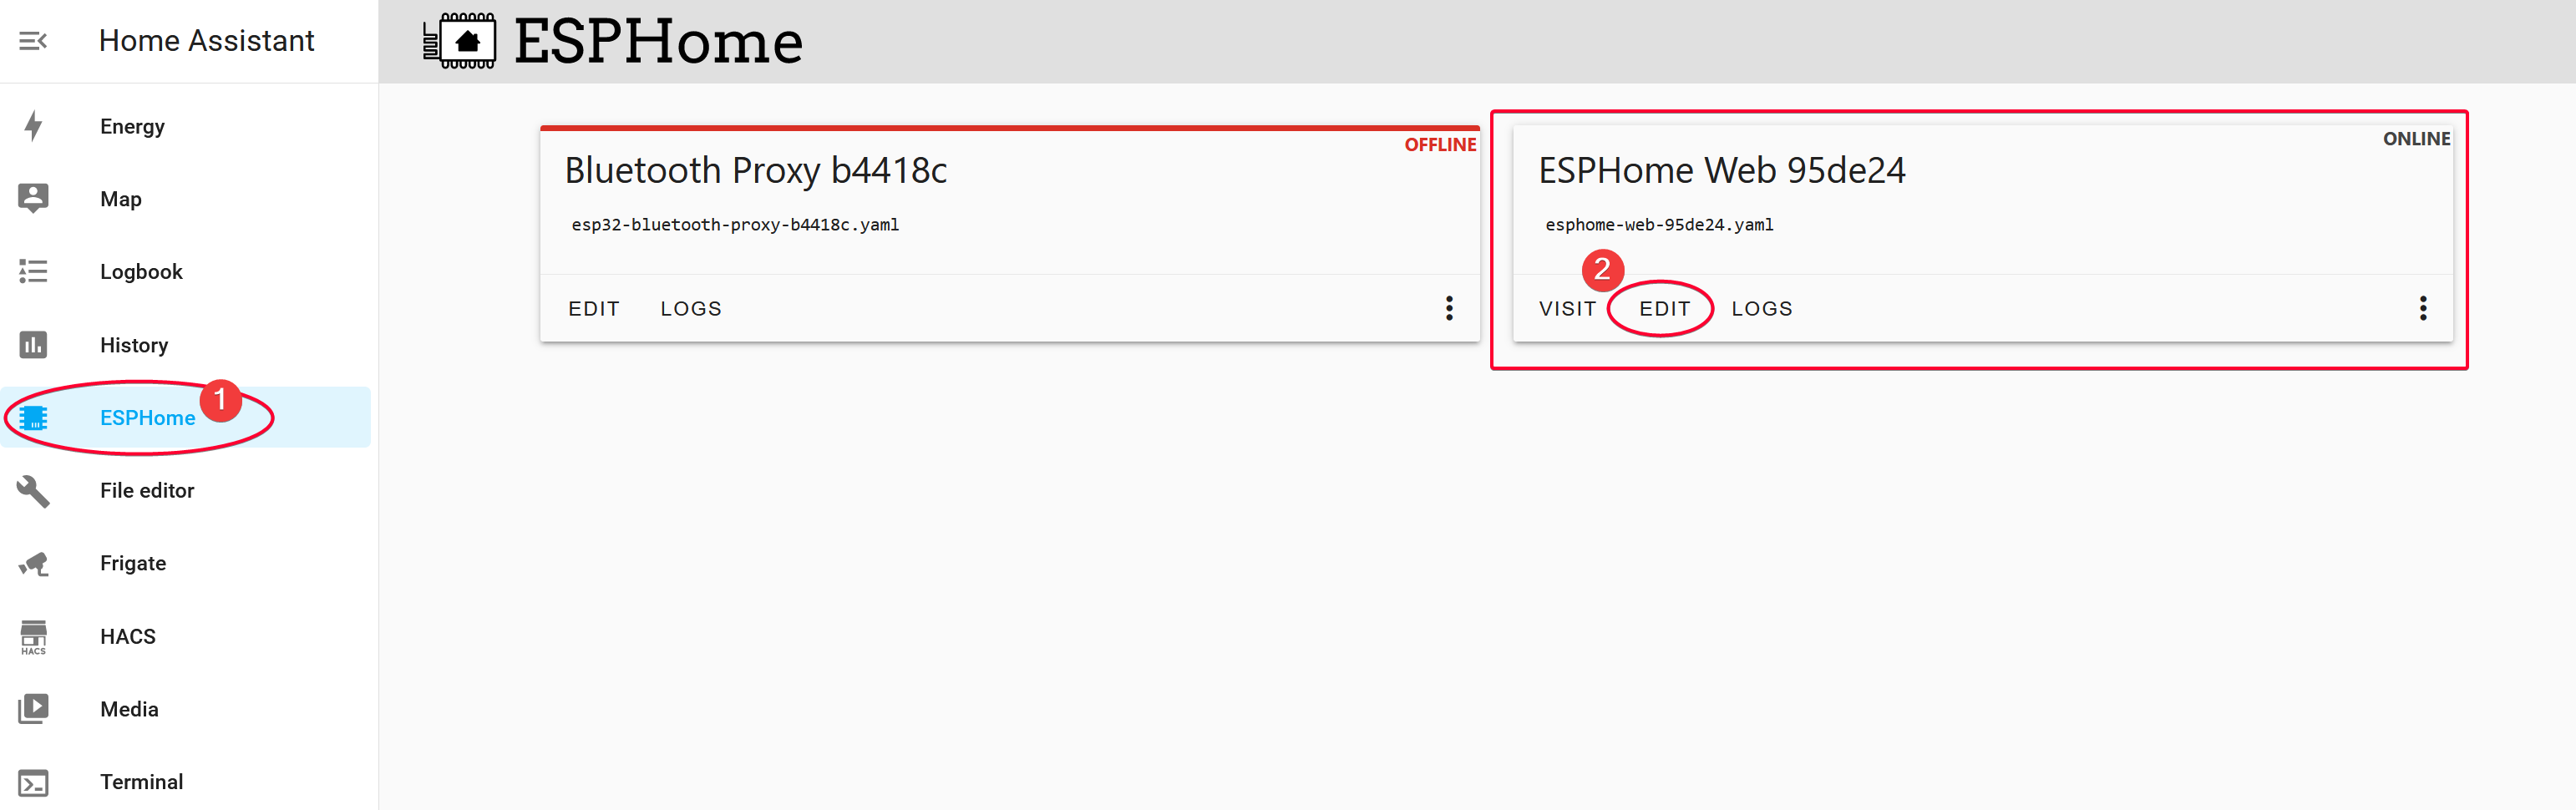
Visit Web - ESPHome and flash a new firmware to it.
Go to HA then Settings > Devices & Integration to see the newly detected device.
Add it to ESP32 Home, it should prompt to install some files.
After installing, click Edit to modify the YAML. We will add pn532 component to it.
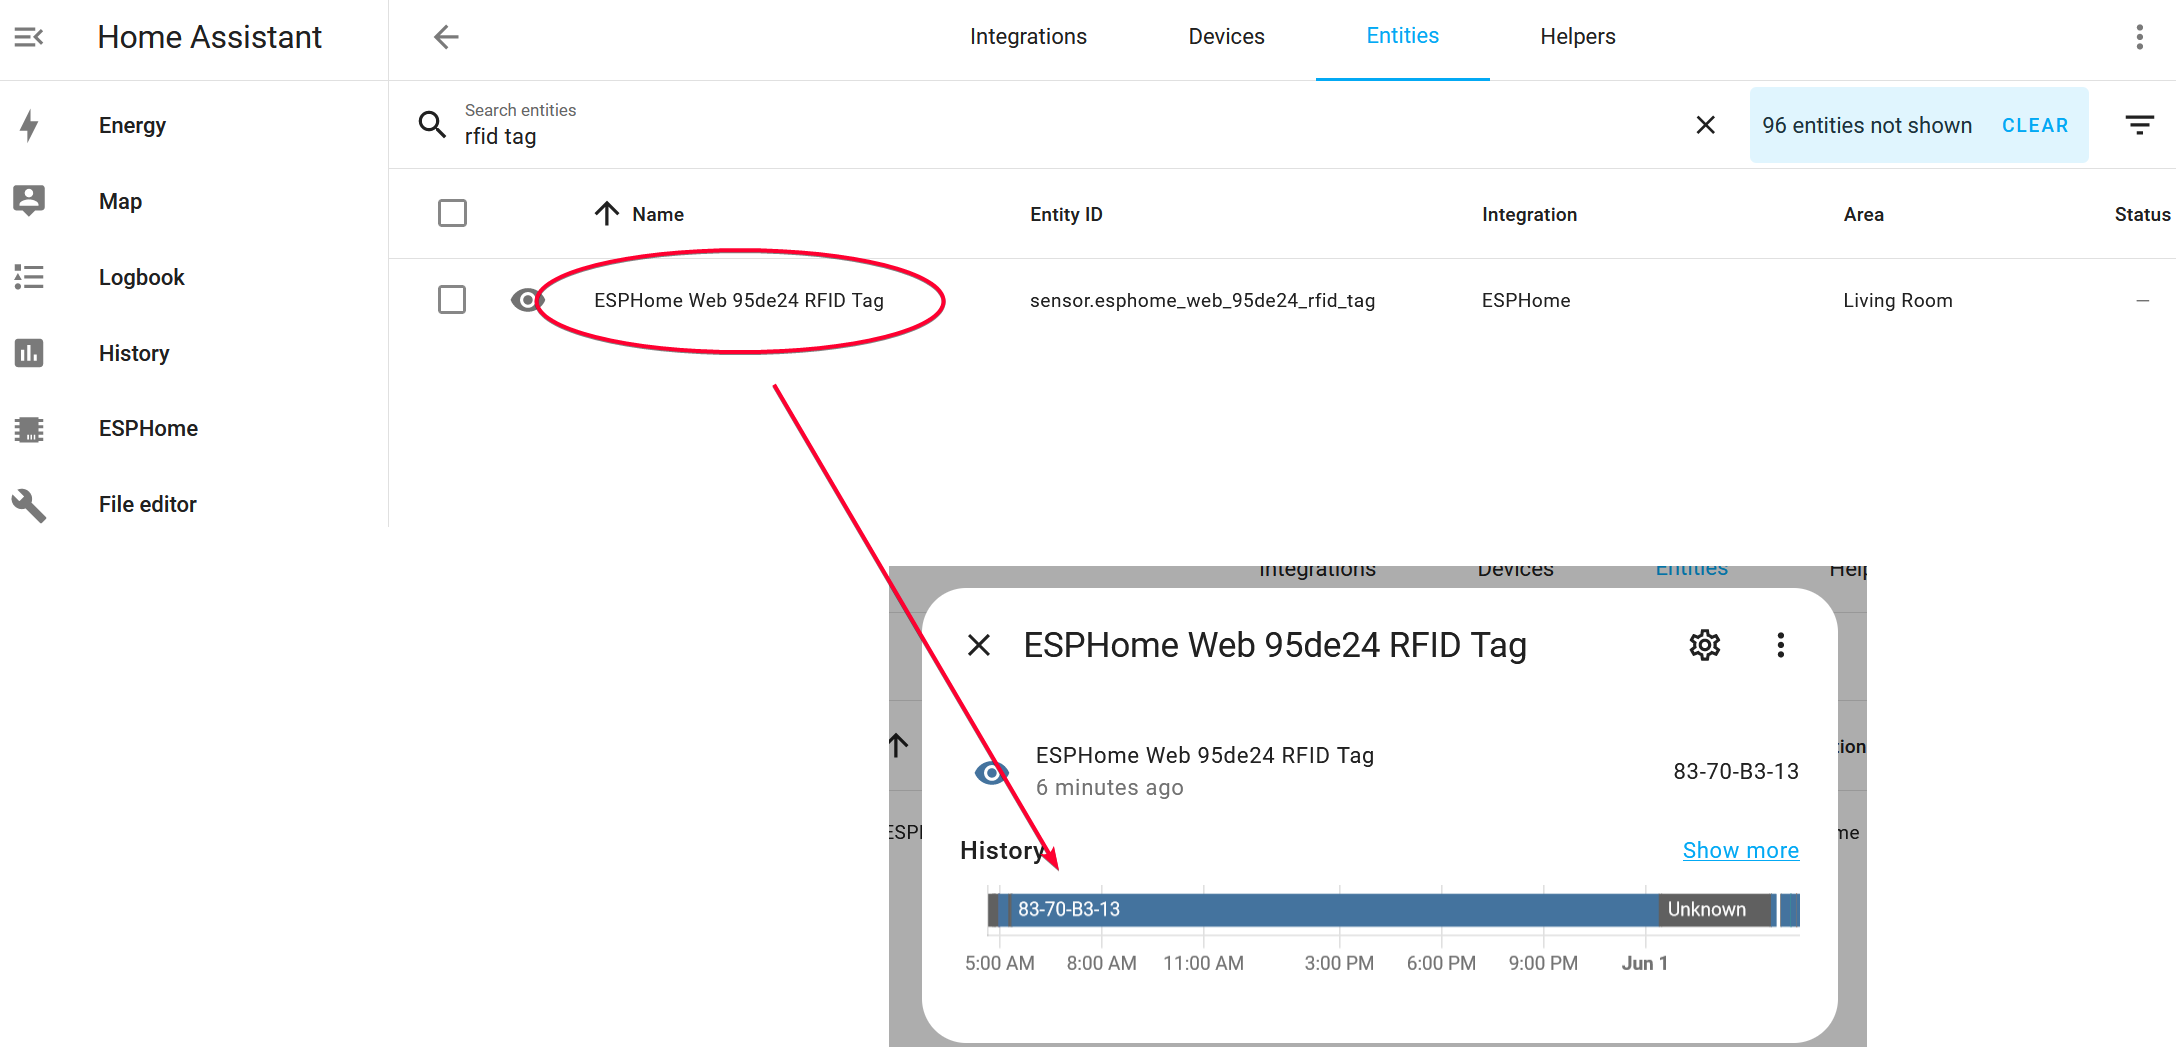
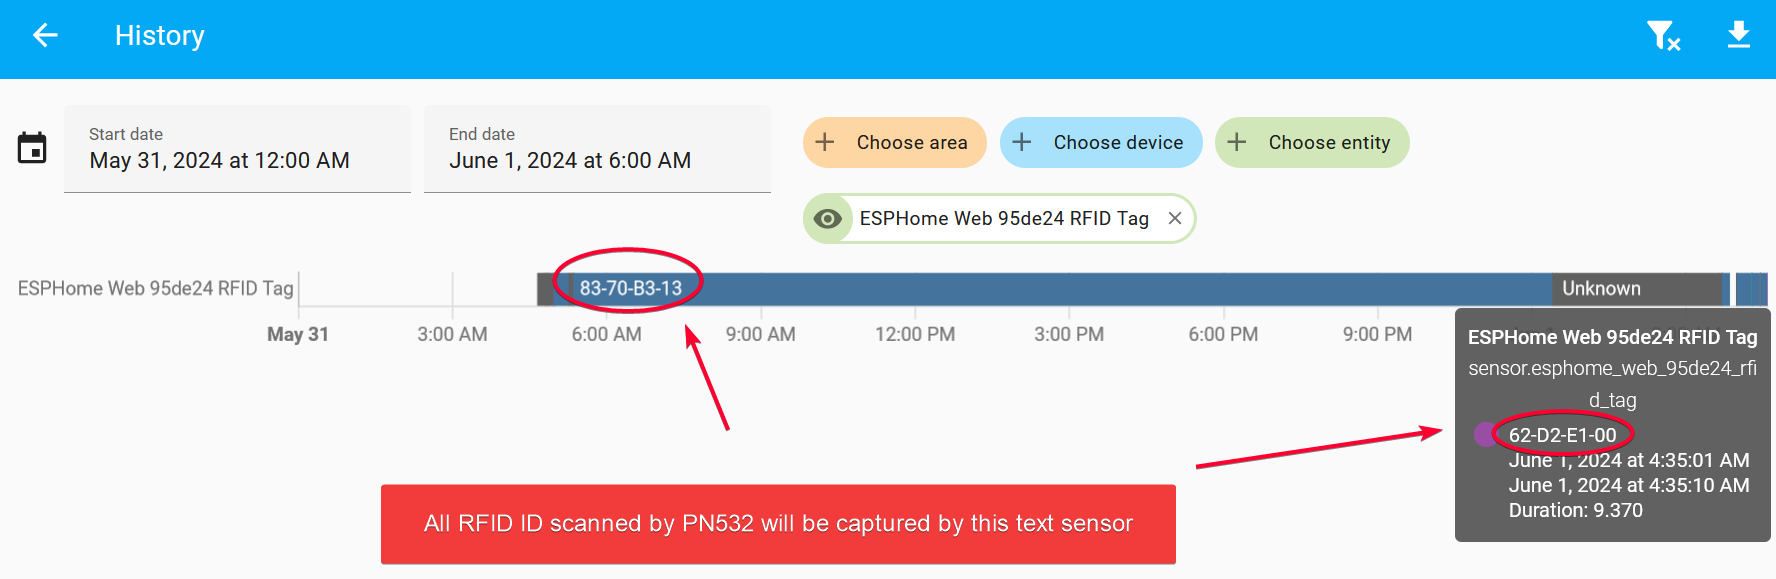
Find the RFID tag, which should be 4 hex
Use … to find
Configure ESP32 with ESP32Home
ESP32Home is a framework developed by Nabu Casa, the same developer team that develop Home Assistant. It makes configuring your ESP32 board with various modules very simple, even simpler than Arduino without any programming needed! All you need to do is adding the module stanza and configuration, then upload the config file to the board!
Add i2c Component
Since we connect PN532 via I2c connection, we will first add the i2c component to define the GPIO on ESP32 that we used to connect to the PN532 board. We will then add pn532_i2c module to configure the PN532 RFID module.
We will first define the i2c component for the pin we used to connect to PN532.
@ref: https://esphome.io/components/i2c#i2c
i2c:
    sda: GPIO21
    scl: GPIO22
    scan: true
    id: bus_a
Add pn532_i2c Component
We then define the pn532_i2c module. See https://esphome.io/components/binary_sensor/pn532#over-i2c for more details.
Note: Replace the uid with the hexadecimal ID for your RFID scanned in the Find RFID Tag section above.
pn532_i2c:
  update_interval: 1s
Next, add a binary sensor and link it with pn532 platform. The sensor will turn ON if the PN532 sensor detected the RFID ID that match the uid defined here.
binary_sensor:
  - platform: pn532
    uid: 74-10-37-94     <-- Replace this with your RFID card ID
    name: "PN532 NFC Tag"
Add Action Upon Card Scan
Let’s also add an action that send the detected RFID ID to HA Tags menu every time the PN532 module detect the card. We can then create various Automation based on that tag event.
pn532_i2c:
update_interval: 1s
on_tag:
then:
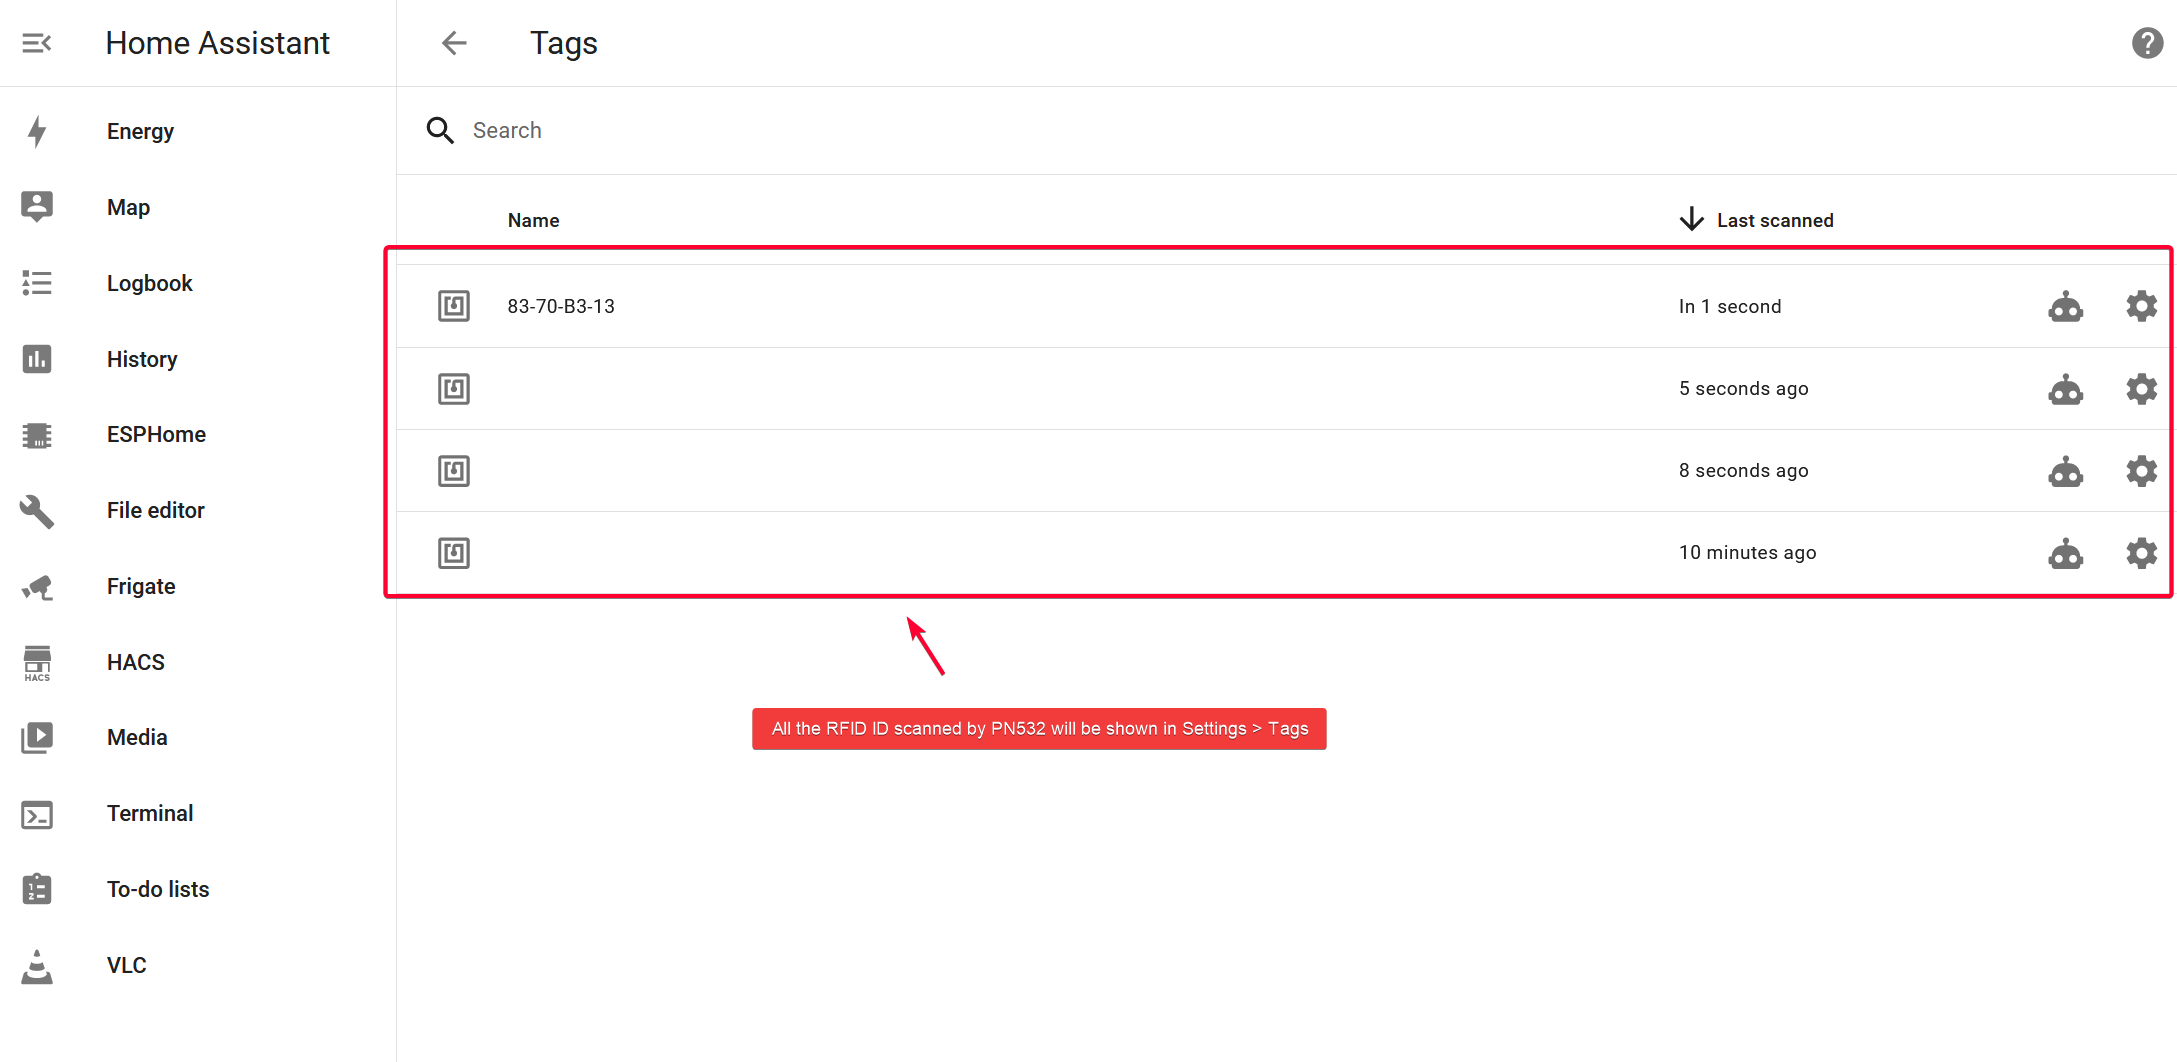
- homeassistant.tag_scanned: !lambda 'return x;'The homeassistant.tag_scanned: !lambda 'return x;' statement will send the detected RFID ID (hexademical) to HA Settings > Tags shown below.
Optional: Add Text Sensor
We can also add a custom text_sensor that shows
pn532_i2c:
  update_interval: 1s
  on_tag:
    then:
    - homeassistant.tag_scanned: !lambda 'return x;'
    - text_sensor.template.publish:
        id: rfid_tag
        state: !lambda 'return x;'

text_sensor:
  - platform: template
    name: "RFID Tag"
    id: rfid_tag
That will print the RFID ID to the text sensor event
All the RFID ID scanned by this PN532 module will be captured and shown to this text sensor.
Complete Configuration
Following are the module stanza that we add that summarize the modules above.
i2c:
    sda: GPIO21
    scl: GPIO22
    scan: true
    id: bus_a

pn532_i2c:
  update_interval: 0.2s
  on_tag:
    then:
    - homeassistant.tag_scanned: !lambda 'return x;'
    - text_sensor.template.publish:
        id: rfid_tag
        state: !lambda 'return x;'

binary_sensor:
  - platform: pn532
    uid: 83-70-B3-13
    name: "PN532 NFC Tag #1"

text_sensor:
  - platform: template
    name: "RFID Tag"
    id: rfid_tag
Upload Firmware
Save the file, then install to ESP32 wirelessly.
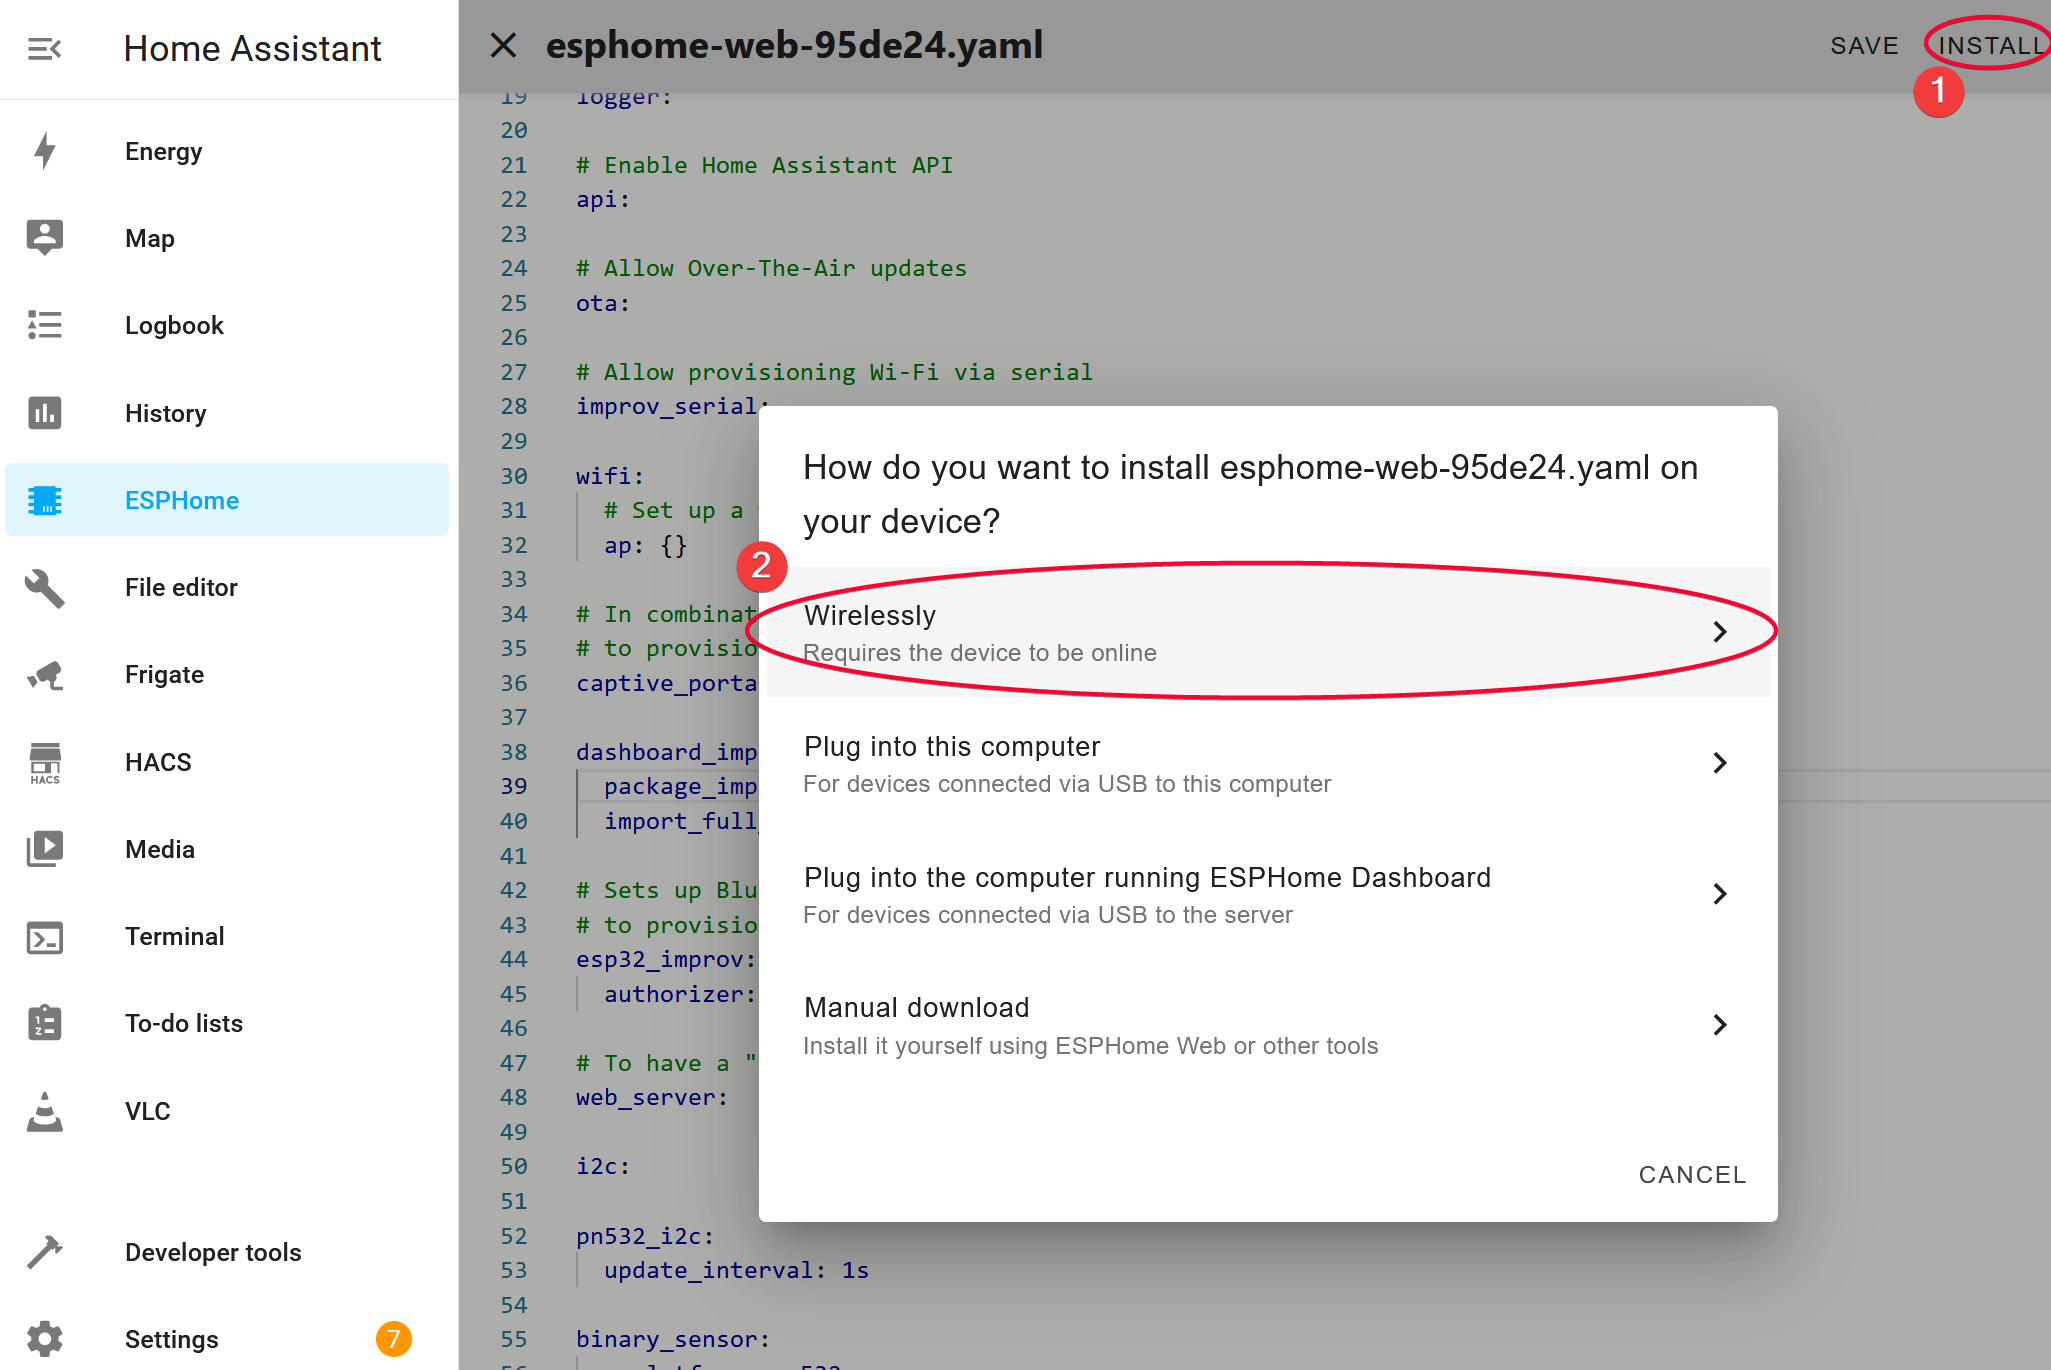
Wait for the firmware to upload and install.
TIP
💡 Every time you make changes to this YAML file, you have to Upload the firmware to the ESP32 device so that it can use the component. What HA did is compile the modules/components you defined here and include that in the final firmware file.
Add More Sensor to ESP32
LED RGB
      - light.turn_on:
          id: my_rgb_light
          brightness: 100%
          red: 0%
          green: 100%
          blue: 0%
Buzzer
...
LCD
...
Use Case 1: Show the scanned RFID ID
# Enable Home Assistant API
api:
  services:
    - service: update_tag_name
      variables:
        tag_name: string
      then:
        - text_sensor.template.publish:
            id: rfid_tag_name
            state: !lambda 'return tag_name;'

text_sensor:
  - platform: template
    name: "RFID Tag"
    id: rfid_tag
  - platform: template
    name: "RFID Tag Name"
    id: rfid_tag_name
    update_interval: never

## LCD
display:
  - platform: lcd_pcf8574
    dimensions: 20x4
    address: 0x27
    lambda: |-
      if (id(rfid_tag).state != "") {
        it.printf(0, 0, "ID: %s", id(rfid_tag).state.c_str());
        it.printf(0, 1, "Name: %s", id(rfid_tag_name).state.c_str());
      } else {
        it.print(0, 0, "Hello World!");
      }
Back to HA, create an Automation.
automation:
  - alias: Update Tag Name in ESPHome
    trigger:
      - platform: event
        event_type: tag_scanned
    action:
      - service: esphome.esp32_lcd_update_tag_name
        data:
          tag_name: "{{ trigger.event.data.tag_id }}"
Use Case 2: Show the scanned RFID ID and also tag name.
We will first create api service here, then create an automation in HA to update this tag.
In ESP32 Home yaml file
# Enable Home Assistant API
api:
  services:
    - service: update_tag_name
      variables:
        tag_name: string
      then:
        - text_sensor.template.publish:
            id: rfid_tag_name
            state: !lambda 'return tag_name;'

text_sensor:
  - platform: template
    name: "RFID Tag"
    id: rfid_tag
  - platform: template
    name: "RFID Tag Name"
    id: rfid_tag_name
    update_interval: never

## LCD
display:
  - platform: lcd_pcf8574
    dimensions: 20x4
    address: 0x27
    lambda: |-
      if (id(rfid_tag).state != "") {
        it.printf(0, 0, "ID: %s", id(rfid_tag).state.c_str());
        it.printf(0, 1, "Name: %s", id(rfid_tag_name).state.c_str());
      } else {
        it.print(0, 0, "Hello World!");
      }
In HA, create an automation.
Example It will call esphome.esphome_web_95de24_update_tag_nameto set the text sensor rfid_tag_name .
Note: The esphome.esphome_web_95de24_update_tag_name is automatically created when you add the service update_tag_name in ESP32 YAML file above.
Define your Tag ID and the tag name that you wanted to show here. Too bad you can’t simply read the tag name you set in HA Tags. So we have to do it manually here.
alias: Update Tag Name in ESPHome
description: Update Tag Name in ESPHome
trigger:
  - platform: event
    event_type: tag_scanned
condition: []
action:
  - service: esphome.esphome_web_95de24_update_tag_name
    data:
      tag_name: >
        {% if trigger.event.data.tag_id == '29-BB-1B-85' %}
          Final Fantasy
        {% elif trigger.event.data.tag_id == '62-D2-E1-00' %}
          Ragnarok Online
        {% else %}
          Unknown
        {% endif %}
mode: single
Troubleshooting
If you noticed that your ESP32 sometimes disconnected or no longer handling the RFID scan event after some time, remove it from ESP32 Home, then Adopt it again. This has been discussed here https://community.home-assistant.io/t/esp8266-api-connection-closed/367371/5
If you click ESP32 Home > Logs then close that menu, you might see the following warning message. Don’t worry and that is completely normal, it simply tells you that your ESP32 board no longer call HA API to view the logs, it doesn’t mean it lost connection to HA for the PN532 event part.
[W][api.connection:104]: ESPHome Logs 2024.5.3 (192.168.1.40): Connection closed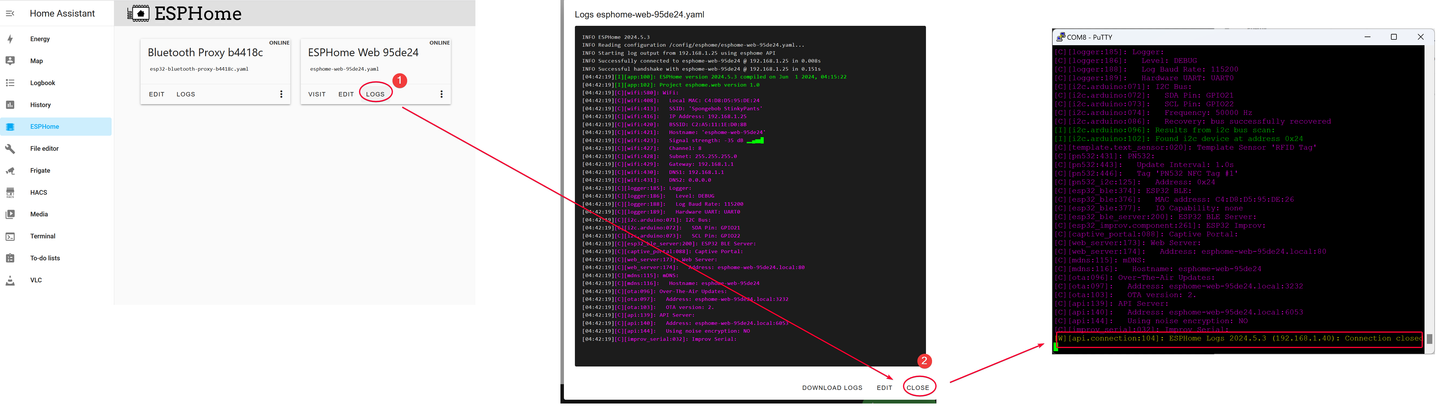
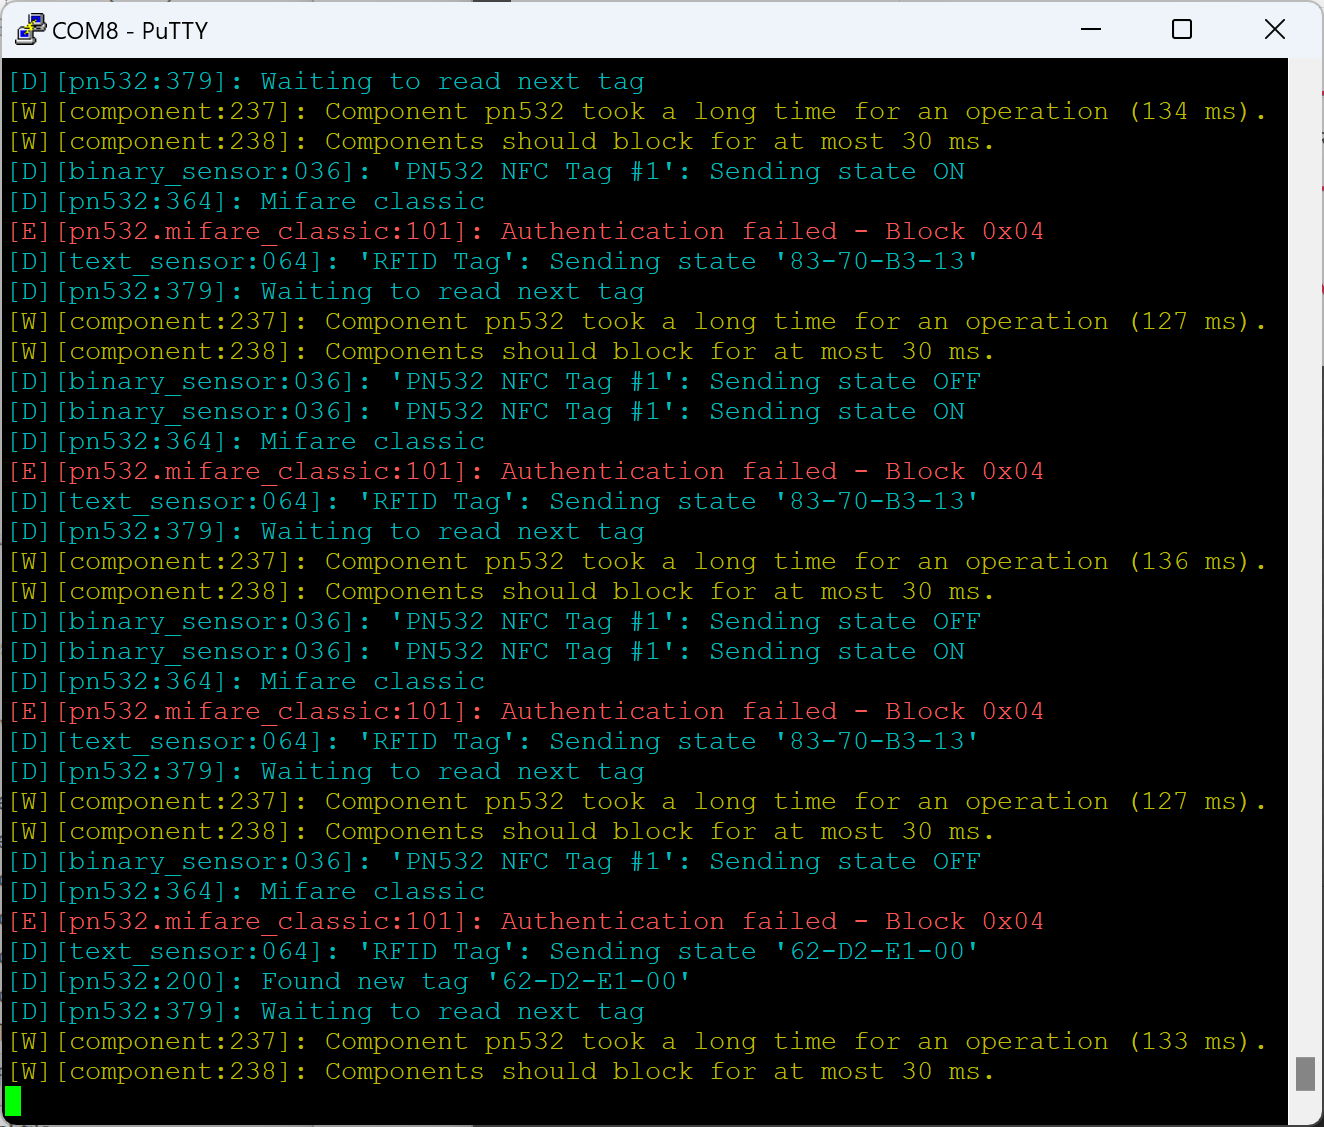
Tips
You can use PuTTY and open the serial COM port to see the ESP32 logs, it is much faster than viewing the logs via HA or the device ESP32 webpage.